Whitelisting Phished for Outlook Advanced Delivery
All Microsoft 365 tenants will have to implement the following in order for Phished simulations to be delivered successfully.
For more information about the advanced delivery policy, see Microsoft's article: Use the Microsoft 365 Defender portal to configure third-party phishing simulations in the advanced delivery policy.
Note: This process can only be completed by your organisation's Exchange administrators.
This guide consists of 2 steps:
Step one is to add a Phished domain and 2 IPs to the Microsoft Defender portal;
Step two is changing a setting in the Phished platform.
STEP 1 - Microsoft Defender portal
Go to the Microsoft Defender portal.
Navigate to "Email & Collaboration" > "Policies & Rules".

3. Click on "Threat policies".

4. Select “Advanced delivery” under “Rules".

5. On the "Advanced delivery" page, go to the "Phishing simulation" tab.

6. If no rules have been created, you will have to click on the “Add” button, as the print screen below shows. If a rule already exists then you will clock on the “Edit” button (see below).

Otherwise: Click “Edit”.

7. On the "Add Third Party Phishing Simulations" pop-up that opens, configure/fill in the below.
- Sending Domain: psr.phished.io
- Sending IP 1: 167.89.25.73
- Sending IP 2: 149.72.177.106
- Simulation URLs to allow: You can leave this field blank.
Simulation URLs are an OPTIONAL setting.
You can enter phishing URL wildcards you intend to use in any phishing campaign(s). Phishing URLs added here will not have their links or attachments blocked or deleted by Microsoft Safe Links or Safe Attachments. Enter URL wildcards using the domain followed by a forward slash and then an asterisk, e.g. example.com/*. Enter a value, and then press "Enter" or select the value that is displayed below the box. Repeat this step as many times as necessary. You can add up to 10 entries.

8. When you are finished, click "Add".

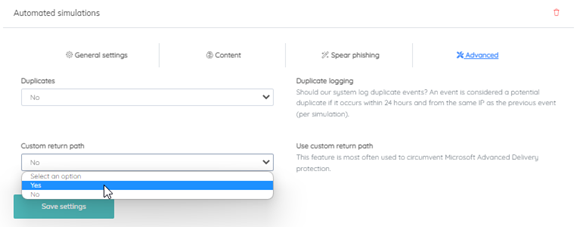
STEP 2 - Phished platform
In the Phished platform, go to Simulations > Automated > Settings > Advanced. Ensure the "Custom return path" dropdown is set to "Yes". Press "Save".