Whitelisting Phished in Microsoft 365
If you are using Outlook as your mail client, there are 2 mandatory instructions to go through to whitelist the Phished mail servers to avoid our simulations ending up in the spam filter or being quarantined.
(i) This manual, for bypassing the spam filter & junk folder, and
(ii) Outlook Advanced Delivery - remember to come back here and click on the link after completing the steps below.
Note: This process can only be completed by your organisation's Exchange administrators.
RULE 1 - "Bypass spam filter"
1. Sign in to the Microsoft Exchange admin center.
2. In the dashboard, under "Mail flow", click on "Rules".

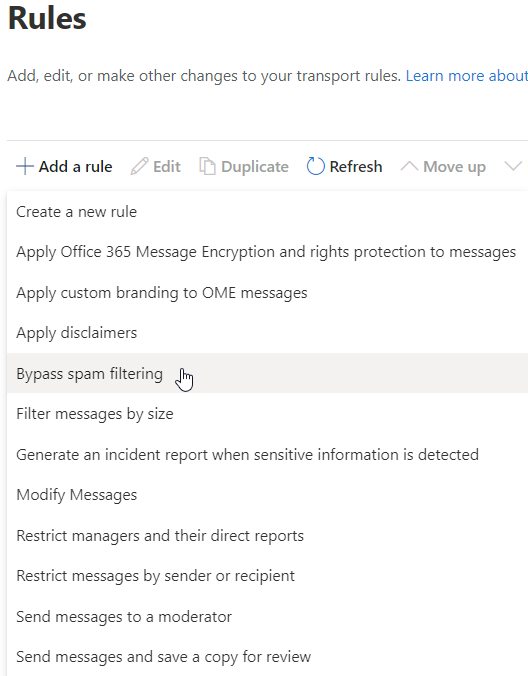
3. Click on the "+" icon, and select "Bypass spam filtering".
Note 1: It is important to select the correct rule.
Note 2: Once you have created this rule ("Bypass spam filtering"), a default action is generated automatically under "Do the following" (i.e. Set the spam confidence level (SCL) to '1'). Do NOT delete this action.
4. Give the rule ("Bypass spam filtering") a name. For example: "Phished - bypass spam filter".

5. In the "Apply this rule if" drop-down list, select "The message headers..." and "includes any of these words".

6. Click on "Enter text".

7. Here you will need to specify the message header name. Therefore, enter "X-PHISHTEST". Proceed by clicking "Save" at the bottom of the pop-up.

8. Next, click on "Enter words".

9. Here you will need to enter the security header value of your added and validated domain(s).
Note: You can find these security header values in the Phished Admin platform, under Management > Organisation > Domains. Click "View domain" under "Action".

10. Once you have entered a value, click on "Add". If you have more than one domain saved in the Phished platform then add the security header for each domain here. Click "Save" when done.
Note: No need to create multiple rules in case of multiple domains. You can add multiple security header values to one rule.

11. Now you can proceed to the second part of the "Bypass spam filtering" rule.
Under "Do the following", click the "+" sign as we will need to add a SECOND action. Please leave the first action untouched (ie: Set the spam confidence level (SCL) to '-1').

12. Under "Do the following", a new action field will become visible.
13. Select "Modify the message properties" and "set a message header".

14. Click on (the first) "Enter text".

15. Enter the following header: "X-MS-Exchange-Organization-BypassClutter". Click “Save”.

16. Click on (the second) "Enter text"
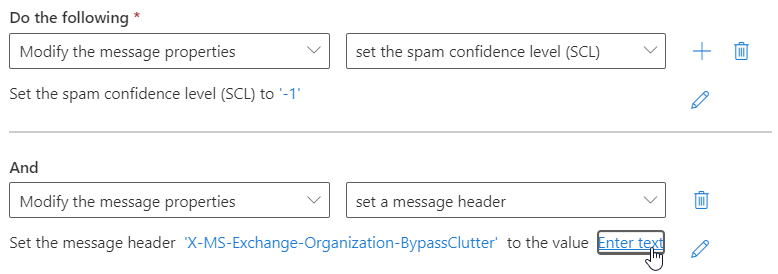
17. Fill in "True" and click “Save”.

18. Please do a final review of the above. If all is correct, click "Next".

19. Under "Set rule settings", you can proceed without making any changes. Click "Next".

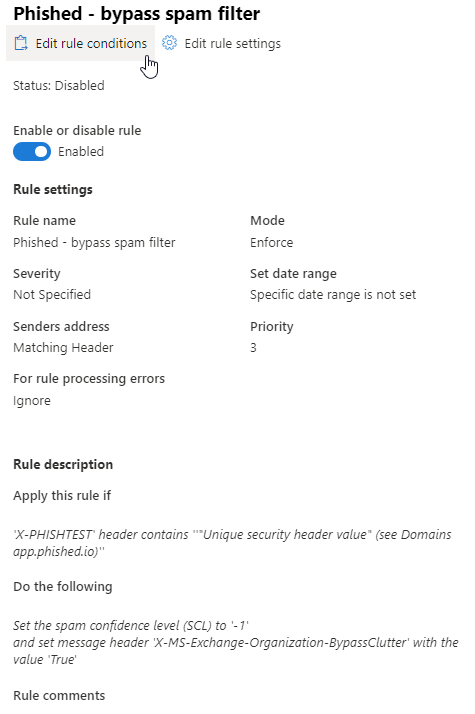
20. "Review and finish". You can do another check (you can compare it with the screenshot below). Click "Finish" to save the bypass spam filtering rule.

21. Once created, you still have to enable to rule. Therefore, click on the rule in the "Rules" section.

22. Here, enable the rule, click on "Edit rule conditions" and thereafter on "Save". Congratulations! You have successfully created a rule to bypass spam filtering!
23. You can proceed with setting up the junk folder bypass (second rule).
RULE 2 - "Bypass junk folder"
1. The second rule is added to bypass the junk folder. Click on the "+" icon, and select "Create a new rule" from the drop-down list.
Note: It is important to select “Create a new rule” and NOT “Bypass spam filtering”.

2. Give the rule a name. For example: "Phished - bypass junk folder".

3. In the "Apply this rule if" drop-down list, select "The message headers..." and "includes any of these words".

4. Click on "Enter text". You will need to specify the message header name. Here, please enter "X-PHISHTEST". Then click "Save", at the bottom of the pop-up.

5. Next, click on "Enter words". Here you will need to enter the security header value of your added and validated domain(s). The same value(s) as in step 9 above, for bypassing spam filtering.
Once you have entered a value, click "Add". When you have added all of the header values, click "Save".
Note: No need to create multiple rules in case of multiple domains. You can add multiple security header values to one rule.

6. Now you can proceed to the second part of the rule. Under "Do the following" select "Modify the message properties" and "set a message header".

7. Click on (the first) "Enter text" and enter the following message header name: "X-Forefront-Antispam-Report". Click "Save".

8. Click on the second "Enter text" and define the header value as "SFV: SKI;". Click "Save".

9. Please do a final review of the above. If all is correct, click "Next".

10. Under "Set rule settings", you can proceed without making any changes. Click "Next".

11. "Review and finish". You can do another check (you can compare it with the screenshot below). Click "Finish" to save the bypass junk folder rule.

12. Once created, you still have to enable to rule. Therefore, click on the rule in the "Rules" section.
13. In this pop-up, enable the rule, click on "Edit rule conditions", and finally on "Save". Congratulations! You have successfully created a rule to bypass junk folder!

Please do a final review of each rule - if they have been set up correctly, our simulations will successfully bypass both the spam filter and junk folder.